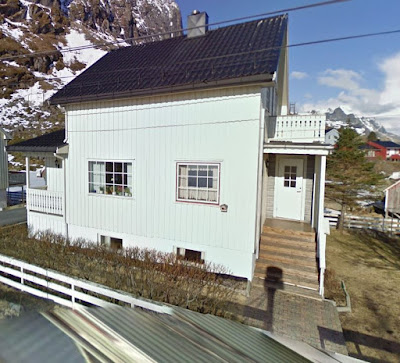
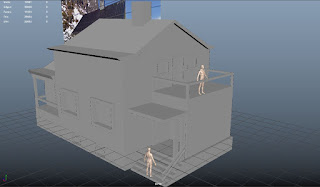
The first problem was that I begun this house in class and I had to export it so I could continue to work on it at home. Once I started working on the asset back at home I had some extrusion errors where the corners will look as though they have been smoothed. Thankfully I easily fixed this problem by deleting a face and replacing it with a new separate one.
I then started to reuse a asset to save me time on making the lines to form the windows on the walls. I had a issue before where since I was in class and did not have my original project to work on, I had to re-create the assets needed to create a wall.
When creating this asset I started to realize how important it is to be consistent on your measurements when it comes to your models. I knew how tall I needed to make this asset so it matches well with the house that I was referencing. I also used the human models as references to make sure that the size looks realistic to live in.
I had to rearrange some UVs from the reused asset to make the door and the windows on the balcony. I made the windows on the balcony a bit smaller than the windows in the front to add emphasis that this is a small house that is being built.
The triangles and the rooftops were reused for this house, saving time on needing to recreate them again. I had to adjust the sizes for the two assets a bit so they could fit in with the base of the house.
I once again rearranged some UVs to add windows to this side of the house. It is the same size as the windows on the opposite side.
The back walls has been added to the house and I decided to make a new back wall to add to the modular asset pool when I start building the houses in Unity.
I then started working on the stairs of the house and I used the reference to determine how many steps are going to be added and how high it should be. I made the stairs one meter high and I knew that 6 steps are going to be added. To make each step I used a cube to make sure that each step had the same width.
After finishing the steps I then added the supports and covered the whole bottom of this asset to cover the empty space on the bottom of this little house
After finishing the house I then started to clean up the history of each asset to make sure they were all clear. Now that I have finished the three base houses that I wanted in my level I know got a better understanding of how big my scope for this level is. I still want to go forward to making a village a player could explore but instead of multiple villages they could visit I am going to shorten it down to one small village.
For the rest of the week I plan on finishing up the small assets I want to include for these houses like doors, lights, fences, etc and work on mainly UVing and texturing them next week. Instead of going with a stylized look with stylized textures I will instead go for a more basic look with basic textures so I could add in more assets to my small village.


No comments:
Post a Comment