Thursday, February 27, 2020

The Village Blog #5

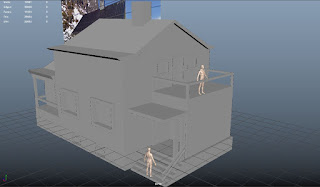
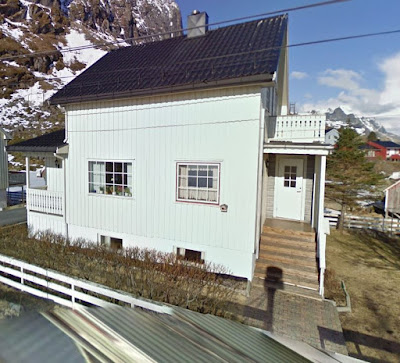
This is the third and final house that I plan to include in this level. I chose this one specifically because it was small and it looked beautiful. Although it is small, there was a few problems that I had when I had begun making the modular assets for this house.

The first problem was that I begun this house in class and I had to export it so I could continue to work on it at home. Once I started working on the asset back at home I had some extrusion errors where the corners will look as though they have been smoothed. Thankfully I easily fixed this problem by deleting a face and replacing it with a new separate one. 

I then started to reuse a asset to save me time on making the lines to form the windows on the walls. I had a issue before where since I was in class and did not have my original project to work on, I had to re-create the assets needed to create a wall. 

When creating this asset I started to realize how important it is to be consistent on your measurements when it comes to your models. I knew how tall I needed to make this asset so it matches well with the house that I was referencing. I also used the human models as references to make sure that the size looks realistic to live in. 

I had to rearrange some UVs from the reused asset to make the door and the windows on the balcony. I made the windows on the balcony a bit smaller than the windows in the front to add emphasis that this is a small house that is being built. 

The triangles and the rooftops were reused for this house, saving time on needing to recreate them again. I had to adjust the sizes for the two assets a bit so they could fit in with the base of the house. 

I once again rearranged some UVs to add windows to this side of the house. It is the same size as the windows on the opposite side. 

The back walls has been added to the house and I decided to make a new back wall to add to the modular asset pool when I start building the houses in Unity. 

I then started working on the stairs of the house and I used the reference to determine how many steps are going to be added and how high it should be. I made the stairs one meter high and I knew that 6 steps are going to be added. To make each step I used a cube to make sure that each step had the same width. 

After finishing the steps I then added the supports and covered the whole bottom of this asset to cover the empty space on the bottom of this little house

After finishing the house I then started to clean up the history of each asset to make sure they were all clear. Now that I have finished the three base houses that I wanted in my level I know got a better understanding of how big my scope for this level is. I still want to go forward to making a village a player could explore but instead of multiple villages they could visit I am going to shorten it down to one small village. 

For the rest of the week I plan on finishing up the small assets I want to include for these houses like doors, lights, fences, etc and work on mainly UVing and texturing them next week. Instead of going with a stylized look with stylized textures I will instead go for a more basic look with basic textures so I could add in more assets to my small village.


Thursday, February 20, 2020

The Village Blog #4

For this week I decided to focus on building the second house for my level. I decided to go with this slightly bigger house compared to the last one because the design of it caught my eye. My goal is to finish the base of the house first and worry about the doors and the fences later. 

I decided to model the house into three separate parts so that if I wanted to make another different design I could possibly reuse these pieces and save some time later. When it came to modeling this piece my only issue was that when working on extruding the door frames on the balcony it would create some unnecessary faces on the back. It was easily fixed by simply deleting them but it was a bit tedious double checking them to see if there was still any left.

The second wall was pretty simple to make since all I have to worry about was adding windows to the walls. Making this wall took me at most 30 minutes since I still had to readjust some UV lines to make the window frames. 

The third wall became a bit more tricky since this was a huge balcony. In the end I decided just to combine the front,side, and back wall to save time and to make it less of a mess. When it comes to making the bars at the top I had to do a tedious process where in order to connect the bars I had to delete the 2 faces of the connecting points and merge their vertices together. This was just to guarantee that I would not have any hidden faces in the model.

Once again since I could not find a reference for the back of this house I just went with the assumption that there will be a door on the back of the house with a couple of windows. Since I have now gotten used to the process of making the doors and windows this went by quickly. 

To finalize the walls for the house i just simply added two windows to the last wall. I did run into the issue where the walls in the back were a bit big when it comes to the width but that was easily fixed with a bit of scaling. 

I then finish off the base of the house by planting a roof on top. This process was done by making one half of the roof on the front size then simply duplicating it to the other. 

Now that I have modeled out the base of the second house I now plan for the rest of this week to model out the extras like the doors and the fences. Once I am done modeling out the tiny details I want on my house I will then move on creating the third house and setting up the UV maps for all of those three houses. 


Thursday, February 13, 2020

The Village Blog #3

For this week I have been in a sort of a block when it comes to knowing the full scope I plan on completing for this project. I decided to just model something that I know will be in the final version of my level. I started off with this simplistic house that I found in Reine, Norway that I decided to model.

I decided to follow the advice my fellow peers gave me and decided to create my house in a modular set style. I started off by modeling the front wall which was a smooth process.  The size of the wall will be 8 meters in width and 6 meters in height. 

The way I have modeled my front wall went smoothly so far with no n-gons and no triangles. 

When it comes to making the side walls of my house things got a bit tricky. Since on the side walls it has a big pointy triangle on the top of it I had to match up the UVs for the triangle top with the wall. 

Thankfully I ran into no problems and I used the target weld tool to connect the lines from the wall to the triangle on the top. The top portion of the triangle had it's normal reversed which I then fixed by reversing them back to normal. 

The same process was done for the other side wall but this time it was more simpler to do since I only had to worry about connecting a fewer lines to the triangle as usual. 

Since I could not find a reference for the backside of this house I simply added a backdoor and a window to fill up the space. making the back wall of the house was also a simple process to go through. 

Once I had finished up the walls of the house I then added pillars to the corner of each wall so they would look like they are connected then finished it off by plopping a roof with a chimney on top. 

In the end this has become the final product of the house. It was simple to make and now that I know how long it takes to make each house it gives me a better idea of the scope that I am going to aim for this project. Since I have done this model in a modular asset fashion it should also save me more time when it comes to making another house because i could just simply reuse these assets but possibly put them with different textures. 


Castle on Wheels Blog #1

Sprint 1


The first task that I was assigned to do for this project is to work on the paper prototype. I was in charge of making the enemy structures so we could use them when we are play testing. I first drew out a concept of how I imagined the enemy structures are going to look like so I could get a confirmation to build them from my Lead, Jake. 

Building them how I wanted them to look like on the concept turned out to be more time consuming than expected, so I have decided to settle on this simple style instead. 

If I remember correctly, I had to build at least 6 enemy archer towers and spawns just to make sure we have enough structures to put into the play test.

I drew the banners myself to clearly indicate what these structures were and that they were the enemy structures the player has to destroy.  After finishing up the enemy structures I had to meet up with my lead and Shawn who is our 3D Modeler. We sat down and played the prototype many times to fully polish the game play that our lead was aiming for. 

Since I did not know how to utilize how to use the Terrain Editor in Unity, I was given the time to look up tutorials and become accustomed to it. In the end this landscape turned out to be my final result and I was then able to start working on the fourth level for our game. 


Sprint 2


Before I started building my level in unity I had to create a concept map to get a general idea in the direction I am heading towards to. The theme of my level was a forest ruins map that had a ton of broken down walls and pillars everywhere. I also wanted the player to get used to having to go up a different height level whenever they are playing our game. 

The player will start at the bottom of the level and will have to utilize the bridges in order to reach the enemy compound. Every time they slowly make their way up they are always greeted with enemy structures. The broken walls are also in favor of the enemy since players now have to plan ahead to see how long it will take their troops to get around the wall and kill the enemy structures. 

Once I got the thumbs up to start working in Unity I immediately started making the terrain for my level. Our team ran into a issue however which is the possibility of overwriting each other's terrain because the way Unity handles it's updates in the collab.  We fixed this issue by letting each other know through discord that one of us is going to add a new terrain and will update it immediately. 

In the end this turned out to be the final product for my terrain for now. I made sure to includes tons of water and empty space since this level is going to be filled with a bunch of trees and forest ruin structures. The only problem I had with the terrain editor is that it becomes hard to create smooth slopes for the troops to climb on. This problem was resolved by doing a tedious process that is time consuming but gets the job done by creating very smooth slopes. 


Thursday, February 6, 2020

The Village Blog #2


For the second week my focus was creating a block out for my level and getting a general idea on what assets are going to be needed. Up above is the location that I had in mind for my village. This was mostly inspired by the pictures that I have seen of Reine in Norway which is a beautiful place. 


I wanted to create an environment where my village is next to some mountains and a giant lake to feel more natural. I plan to fill the empty space of the area that is left with some trees.


This picture shows a general idea of how I want my environment to look like so when the player looks out in the distance they don’t simply see the void of Unity. Most of the map is going to be filled up by the ocean while the main part of the map is going to be on land.


This is a close up picture of what the village is going to look like. The main part of the level is that the player is going to walk on the the village near the light tower. The other village is just going to fill up the space for the other island so it could feel a bit more populated with human life.


This is where I plan for the player to start which is one of the houses on the main village. The goal is for the player to simply go to the local market and buy some groceries for their mother. During this time the player could freely walk around and explore the area. 


The market is going to be located at the main plaza in the middle of those two buildings. Currently I’m deciding whether or not the player is going inside the market and getting groceries or will they walk up the door and complete their goal. 


The local lake of the village is going to be located to the left of the market. This is purely for aesthetic purposes to make the village look a bit more beautiful. It is going to be surrounded by trees and will be close to the giant mountains near the village. 


The list above contains the main assets that I want in the level. Some of the assets listed will have different styles such as the trees and houses to add a bit more variation. Since I am going for a simplified style for my level I expect myself to finish up these models in one or two weeks since they have relatively simple geometry. However if it takes longer than expected then the max will be three weeks. After finishing up the models and giving them their simple textures I will then implement them to my level and move on to making the terrain for the village.